Since I've made this recipe four times in the past few weeks, and countless times before that, I figured it was time to share the love. This quiche is quick, simple, and versatile. You can make it with a premade crust (not so clean) or without. It can even be made ahead of time and frozen** for later use. The cheeses and add-ins are completely up to you. Quiche is a great way to use up less-than-full-portions of meats and vegetables that might be getting lonesome in your fridge!
Today the ones I made were cheddar/broccoli/Canadian bacon, and cheddar/mozzarella/homegrown zucchini/Canadian bacon. It's great to have them ready for a fuss-free midweek dinner. We usually serve ours with fresh fruit and toast. In the fall I might swap the toast for some skillet potatoes and onion.
Quick Quiche -- inspired by an old recipe from allrecipes.com
serves 4
1 cup shredded cheese (shred your own--better taste and texture)
3 teaspoons all-purpose flour (King Arthur GF is great)
1/2 cup cooked meat, diced (ham, bacon, chicken, sausage...)
1/2 cup chopped veggies (broccoli, zucchini, bell peppers, onion, potato...)
3 whole eggs
1 cup lowfat milk
1/4 tsp fine sea salt
1/4 tsp dry mustard powder
1 Tbsp dried parsley (optional)
1 unbaked 9" pie crust (optional)
1. Preheat oven to 400*F.
2. In a medium bowl, toss flour with grated cheese. Sprinkle into lightly greased 9" pie plate or premade crust.
3. Put diced meat and veggies on top of cheese.
4. In a bowl, combine eggs, milk, salt, mustard powder, and parsley. Whisk until smooth and pour over meat in pie plate.
5. Put dish on baking sheet in case of overflow. Bake for 45-60 minutes, or until filling is set and top is golden brown. If using a pie crust, cover edges with aluminum foil halfway through cooking to prevent burning.
**TO FREEZE: After all ingredients have been mixed and put into pie plate, cover the surface with a piece of plastic wrap. Place a piece of foil over that and crimp edges tightly. Freeze FLAT! When ready to use, put pie plate onto a baking sheet and put into a cold oven. Allow oven and dish to pre/re-heat together. Cooking time will be closer to 60 minutes when using a frozen quiche.
Showing posts with label eggs. Show all posts
Showing posts with label eggs. Show all posts
Sunday, July 15, 2012


Wednesday, January 19, 2011
Rutabaga. It's just fun to say.
Ever had a rutabaga? On purpose? It's been years for me. My family used to participate in historical interpreting/re-enacting at Fort Michilimackinac when I was in high school, and I recall making a pot pie that included rutabagas during the "harvest" weekend--that's the last time I remember rutabaggin' it.
Tonight when I made this frittata for dinner, I was excited to use one again. Not because I remember being over the moon for the lumpy brown veggie, but because I couldn't remember what it was like, and I felt like I was trying it for the first time. I like trying new things--food things, that is. I'm a creature of habit everywhere else. ;)
Here's a play-by-play.
It was ugly.

With the ends sliced off and this rocklike veggie in half, it was time to peel.


It was easier to peel than the butternut squash I prepped next. (Love that Rosle peeler! You can find it on Amazon; it's also in the Kitchen Gadgets section of my aStore, which is linked to the right).

Because of the way I wanted to use it, cubed was the best shape.
 I was surprised to see that my "rutabaggy" (as I called it at the Fort) turned a lovely golden color.
It was a fantastic addition to this frittata; I told The H that one day I'd like to eat just the filling, sans eggs--though the whole thing was really, really good.

Rutabagas are similar to potatoes in texture (the website I referenced for cooking tips likened the flavor to a turnip, but really, how many people would be like, "Oh yeah, I know exactly how a turnip tastes; good comparison!"?) but with more flavor, almost a touch of sweetness.
Oh, and this was my first experience with collard greens, too. Thanks for posting and blogging this great recipe, Local Cook!
I'm going to crack open my copy of History from the Hearth , a cookbook that the lead interpreter wrote (for which my sisters, friends, and I modeled*), and see what other uses I can find for this surprisingly tasty root veggie. I think it would be fantastic mixed into homemade mashed potatoes or sliced into a casserole of scalloped taters.
*Yep indeed, pics of an awkward tween Clean Eating Machine have been published for the world (ok fine, "the few random people who've ever seen this book") to see. And that's how I rock it, rutabaggy style.
Tonight when I made this frittata for dinner, I was excited to use one again. Not because I remember being over the moon for the lumpy brown veggie, but because I couldn't remember what it was like, and I felt like I was trying it for the first time. I like trying new things--food things, that is. I'm a creature of habit everywhere else. ;)
Here's a play-by-play.
It was ugly.

With the ends sliced off and this rocklike veggie in half, it was time to peel.


It was easier to peel than the butternut squash I prepped next. (Love that Rosle peeler! You can find it on Amazon; it's also in the Kitchen Gadgets section of my aStore, which is linked to the right).

Because of the way I wanted to use it, cubed was the best shape.

It was a fantastic addition to this frittata; I told The H that one day I'd like to eat just the filling, sans eggs--though the whole thing was really, really good.


Rutabagas are similar to potatoes in texture (the website I referenced for cooking tips likened the flavor to a turnip, but really, how many people would be like, "Oh yeah, I know exactly how a turnip tastes; good comparison!"?) but with more flavor, almost a touch of sweetness.
Oh, and this was my first experience with collard greens, too. Thanks for posting and blogging this great recipe, Local Cook!
I'm going to crack open my copy of History from the Hearth
, a cookbook that the lead interpreter wrote (for which my sisters, friends, and I modeled*), and see what other uses I can find for this surprisingly tasty root veggie. I think it would be fantastic mixed into homemade mashed potatoes or sliced into a casserole of scalloped taters. *Yep indeed, pics of an awkward tween Clean Eating Machine have been published for the world (ok fine, "the few random people who've ever seen this book") to see. And that's how I rock it, rutabaggy style.
Tuesday, October 5, 2010
Potato-crust veggie quiche
This recipe, our Sunday lunch, kind of formed in my head before I knew quite how to execute it. I'd seen the potato crust recipe on a cauliflower pie from Branny Boils Over, but knew for certain that The H would revolt if I tried to serve that as a meal. The end of the week in our house usually means breakfast for dinner so my thoughts turned to eggs. Along with the last three pattypan squash from co-op pickup and some red onion, I had a pretty quick and easy filling. We enjoyed co-op chicken apple sausage and homemade applesauce from a friend on the side.

If I'd had more time (the cranky time-bomb that is the little guy was D-O-N-E and ready for a nap) I would've liked to bake the unfilled crust longer; the brown parts on the edges at the very end were my favorite part. Just like hashbrowns!

Because of our limited time, I sauteed the squash and onion in a little olive oil with salt, pepper, and parsley to get them a head start before adding them to the crust to finish cooking.

Potato-Crust Veggie Quiche
adapted from Branny Boils Over and my own imagination
Potato crust:
2 cups packed grated raw potato
1/2 tsp salt
1 beaten egg white
1/4 cup grated onion
Veggie filling:
2 cups diced vegetables of your choice
1/2 cup diced onion
1/4 tsp garlic powder
1/2 tsp dried parsley, optional
1/2 Tbsp olive oil
1/2 cup shredded cheese
3 eggs
1/2 cup low-fat milk
Salt and pepper to taste
Preheat oven to 400*. In a medium bowl, combine crust ingredients and mix well. Press firmly into a 9-inch pie plate that has been lightly greased (or sprayed) and bake 30 minutes. While crust is baking, dice vegetables and onion for filling.
In a large skillet, heat oil and saute veggies, onion, garlic powder, and parsley until slightly softened and browned.
When crust is done (it will look dry, not soupy, and will be browned at the edges), remove from oven and reduce temperature to 350*. Pour diced veggies and onion into crust. Top with shredded cheese.
Whisk eggs with salt, pepper, and milk and slowly pour over the veggies, letting it make its way in between everything. Set the pie plate on a baking sheet and bake for 30 minutes or until filling is set. Remove from oven and let stand 5 minutes before cutting.


If I'd had more time (the cranky time-bomb that is the little guy was D-O-N-E and ready for a nap) I would've liked to bake the unfilled crust longer; the brown parts on the edges at the very end were my favorite part. Just like hashbrowns!

Because of our limited time, I sauteed the squash and onion in a little olive oil with salt, pepper, and parsley to get them a head start before adding them to the crust to finish cooking.

Potato-Crust Veggie Quiche
adapted from Branny Boils Over and my own imagination
Potato crust:
2 cups packed grated raw potato
1/2 tsp salt
1 beaten egg white
1/4 cup grated onion
Veggie filling:
2 cups diced vegetables of your choice
1/2 cup diced onion
1/4 tsp garlic powder
1/2 tsp dried parsley, optional
1/2 Tbsp olive oil
1/2 cup shredded cheese
3 eggs
1/2 cup low-fat milk
Salt and pepper to taste
Preheat oven to 400*. In a medium bowl, combine crust ingredients and mix well. Press firmly into a 9-inch pie plate that has been lightly greased (or sprayed) and bake 30 minutes. While crust is baking, dice vegetables and onion for filling.
In a large skillet, heat oil and saute veggies, onion, garlic powder, and parsley until slightly softened and browned.
When crust is done (it will look dry, not soupy, and will be browned at the edges), remove from oven and reduce temperature to 350*. Pour diced veggies and onion into crust. Top with shredded cheese.
Whisk eggs with salt, pepper, and milk and slowly pour over the veggies, letting it make its way in between everything. Set the pie plate on a baking sheet and bake for 30 minutes or until filling is set. Remove from oven and let stand 5 minutes before cutting.

Sunday, August 15, 2010
Green eggs, no ham
You wouldn't believe how excited I was to find tomatillos for $0.88/lb at our new, within-walking-distance produce store this weekend. Let's just say it was probably a good thing I hadn't had much to drink that day. :)
I had intended to make a little batch of salsa verde for snacking on this week, but quickly changed plans when I saw a teeny little sidebar recipe for "Omelette with Tomatillo Sauce" in the latest issue of Clean Eating Magazine. They give a nice write-up of tomatillos and all their tarty goodness--for example, did you know that they are a good source of vitamin C and potassium? Me neither!

Omelette with Tomatillo Sauce
from Clean Eating Magazine, September/October 2010
serves 1
Ingredients:
Tomatillo Sauce:
1 tsp extra-virgin olive oil
1 clove garlic, minced
1 Tbsp jalapeno pepper, minced
2 tomatillos, husks removed and chopped
Pinch of sea salt
Omelette:
1 egg
2 egg whites
Cooking spray
2 Tbsp fresh cilantro, chopped
Directions:
1. Prepare tomatillo sauce by sauteeing oil, garlic, and jalapeno over low heat in a small skillet until garlic turns light brown. Add tomatillos and salt; cook 4-6 minutes.
2. While sauce is cooking, whisk egg and egg whites together in a small bowl. Spray a medium skillet with cooking spray and set over medium heat. Add eggs to skillet.
3. With a spatula, pull egg away from sides of pan as it cooks. Once the eggs start to set, sprinkle half of the omelette with cilantro and fold the other half over the top. Cook until fully set.
4. Top omelette with tomatillo sauce and serve hot.

This made a lovely tasty post-church lunch, paired with no-sugar-added strawberry applesauce. I doubled everything except the tomatillos--I used three medium/large ones.
Nutrients per serving:
Calories - 183
Total fat - 11g
Saturated fat - 2g
Carbs - 7g
Fiber - 2g
Sugars - 4g
Protein - 15g
Sodium - 303mg
Cholesterol - 212 mg
I had intended to make a little batch of salsa verde for snacking on this week, but quickly changed plans when I saw a teeny little sidebar recipe for "Omelette with Tomatillo Sauce" in the latest issue of Clean Eating Magazine. They give a nice write-up of tomatillos and all their tarty goodness--for example, did you know that they are a good source of vitamin C and potassium? Me neither!

Omelette with Tomatillo Sauce
from Clean Eating Magazine, September/October 2010
serves 1
Ingredients:
Tomatillo Sauce:
1 tsp extra-virgin olive oil
1 clove garlic, minced
1 Tbsp jalapeno pepper, minced
2 tomatillos, husks removed and chopped
Pinch of sea salt
Omelette:
1 egg
2 egg whites
Cooking spray
2 Tbsp fresh cilantro, chopped
Directions:
1. Prepare tomatillo sauce by sauteeing oil, garlic, and jalapeno over low heat in a small skillet until garlic turns light brown. Add tomatillos and salt; cook 4-6 minutes.
2. While sauce is cooking, whisk egg and egg whites together in a small bowl. Spray a medium skillet with cooking spray and set over medium heat. Add eggs to skillet.
3. With a spatula, pull egg away from sides of pan as it cooks. Once the eggs start to set, sprinkle half of the omelette with cilantro and fold the other half over the top. Cook until fully set.
4. Top omelette with tomatillo sauce and serve hot.

This made a lovely tasty post-church lunch, paired with no-sugar-added strawberry applesauce. I doubled everything except the tomatillos--I used three medium/large ones.
Nutrients per serving:
Calories - 183
Total fat - 11g
Saturated fat - 2g
Carbs - 7g
Fiber - 2g
Sugars - 4g
Protein - 15g
Sodium - 303mg
Cholesterol - 212 mg
Saturday, July 10, 2010
Something from nothing
The other day I needed lunch and there was "nothing to eat." Or so it would seem, to the untrained (read: non-cheapskate) eye.


I knew I had about a cup of brown rice to use, and after that I was winging it. Pulling random things out of the fridge suddenly gave me an idea...

I sauteed a clove of garlic with green onions, then added some thawed shrimp and crushed red pepper flakes.

Then I added 1/2 of a summer squash and a giant handful of Napa cabbage. When all that was wilty, I removed it from the skillet and tossed in my cup of brown rice, which I seasoned with wheat-free tamari.

When it was warm, I stirred in a whisked egg until it was cooked through, then added back the rest of my goodies, plus some Microplaned ginger.
And shrimp fried rice was born.

I was too heavy-handed with the tamari; next time I'd err on the side of not enough, and add more to taste later. The chopsticks are for decoration only--this stuff got shoveled in faster than the 'sticks could handle, so a fork was my weapon of choice. Nice mental pic, huh? What I meant was "It was very good."
Thursday, July 1, 2010
Breakfast for dinner
Tonight the three of us went for a run after The H got home from work, so dinner needed to be something quick and easy that we could make afterwards and still get the little guy in bed at a decent time. I made a gluten-free coffeecake this afternoon, so we decided on eggs to round it out.


It ended up being a kind of fridge cleanout meal, since I got to use up the garlic scapes, golden zucchini, beet greens, and a few eggs, in addition to some cherries and a few near-wrinkly peaches that I served on the side.

The H requested poached over scrambled, so I nestled the eggs in the greens/zucchini and let them cook through a bit before putting them in the oven to set completely (make sure your skillet is oven-safe if you try this). I meant to put some goat cheese in there, but I forgot.


Breakfast for dinner = coffee, so The H made a fresh pot, and we were good to go.

Wednesday, June 30, 2010
Summertime, and the livin' is CHILLY!
The high temperature yesterday was barely into the 70s. It was breezy and sunny, and perfect--as close to fall as we'll get for the next few months! My favorite. I celebrated it with a trip to the farmer's market AND by looking ahead to *real* fall weather and registering for my first full marathon in October! (FYI, a marathon is always 26.2 miles--always. Anything less is not a marathon; anything more is an "ultra"marathon.) I've been following an 18-week training plan for the past 2 1/2 weeks, so it was about time I officially registered. Wish me luck!
Lunch was a lovely little autumnal beet-green-and-poached-egg skillet topped with crumbled goat cheese, sea salt, and black pepper. Those odd little yellow-green things are garlic scapes and green onions, from last week's trip to the market. I chased it all down with a warm, steamy mug of Oregon Chai. Cheers to summertime fall!

Lunch was a lovely little autumnal beet-green-and-poached-egg skillet topped with crumbled goat cheese, sea salt, and black pepper. Those odd little yellow-green things are garlic scapes and green onions, from last week's trip to the market. I chased it all down with a warm, steamy mug of Oregon Chai. Cheers to summertime fall!
Tuesday, June 15, 2010
Eat-Clean Egg Salad
This was lunch yesterday. I've been wanting to make it for months, but every time I have the eggs made, someone eats the cottage cheese I was saving, or I run out of green onion, or... you get the point. The H came home for lunch, a rarity in our household, and since we didn't have any leftovers to heat up, we needed something fresh and fast. And I finally had everything I needed! He peeled eggs while I chopped veggies, and we were sitting down to eat in no time.


Eat-Clean Egg Salad
from The Eat-Clean Diet for Family & Kids by Tosca Reno
Makes 1 cup
1/4 cup fat-free cottage cheese
1 Tbsp skim milk
1 tsp prepared mustard
4 hard boiled egg whites, diced
1 hard boiled egg yolk
2 Tbsp chopped green onion (one onion)
2 Tbsp chopped celery (one rib)
Dash of curry powder
1/4 tsp sea salt
1. In a medium-sized bowl, whip cottage cheese and milk until smooth. (I didn't make it smooth--no biggie.)
2. Mix remaining ingredients except egg whites with cottage cheese mixture.
3. Add diced egg whites to mixture; mix well.
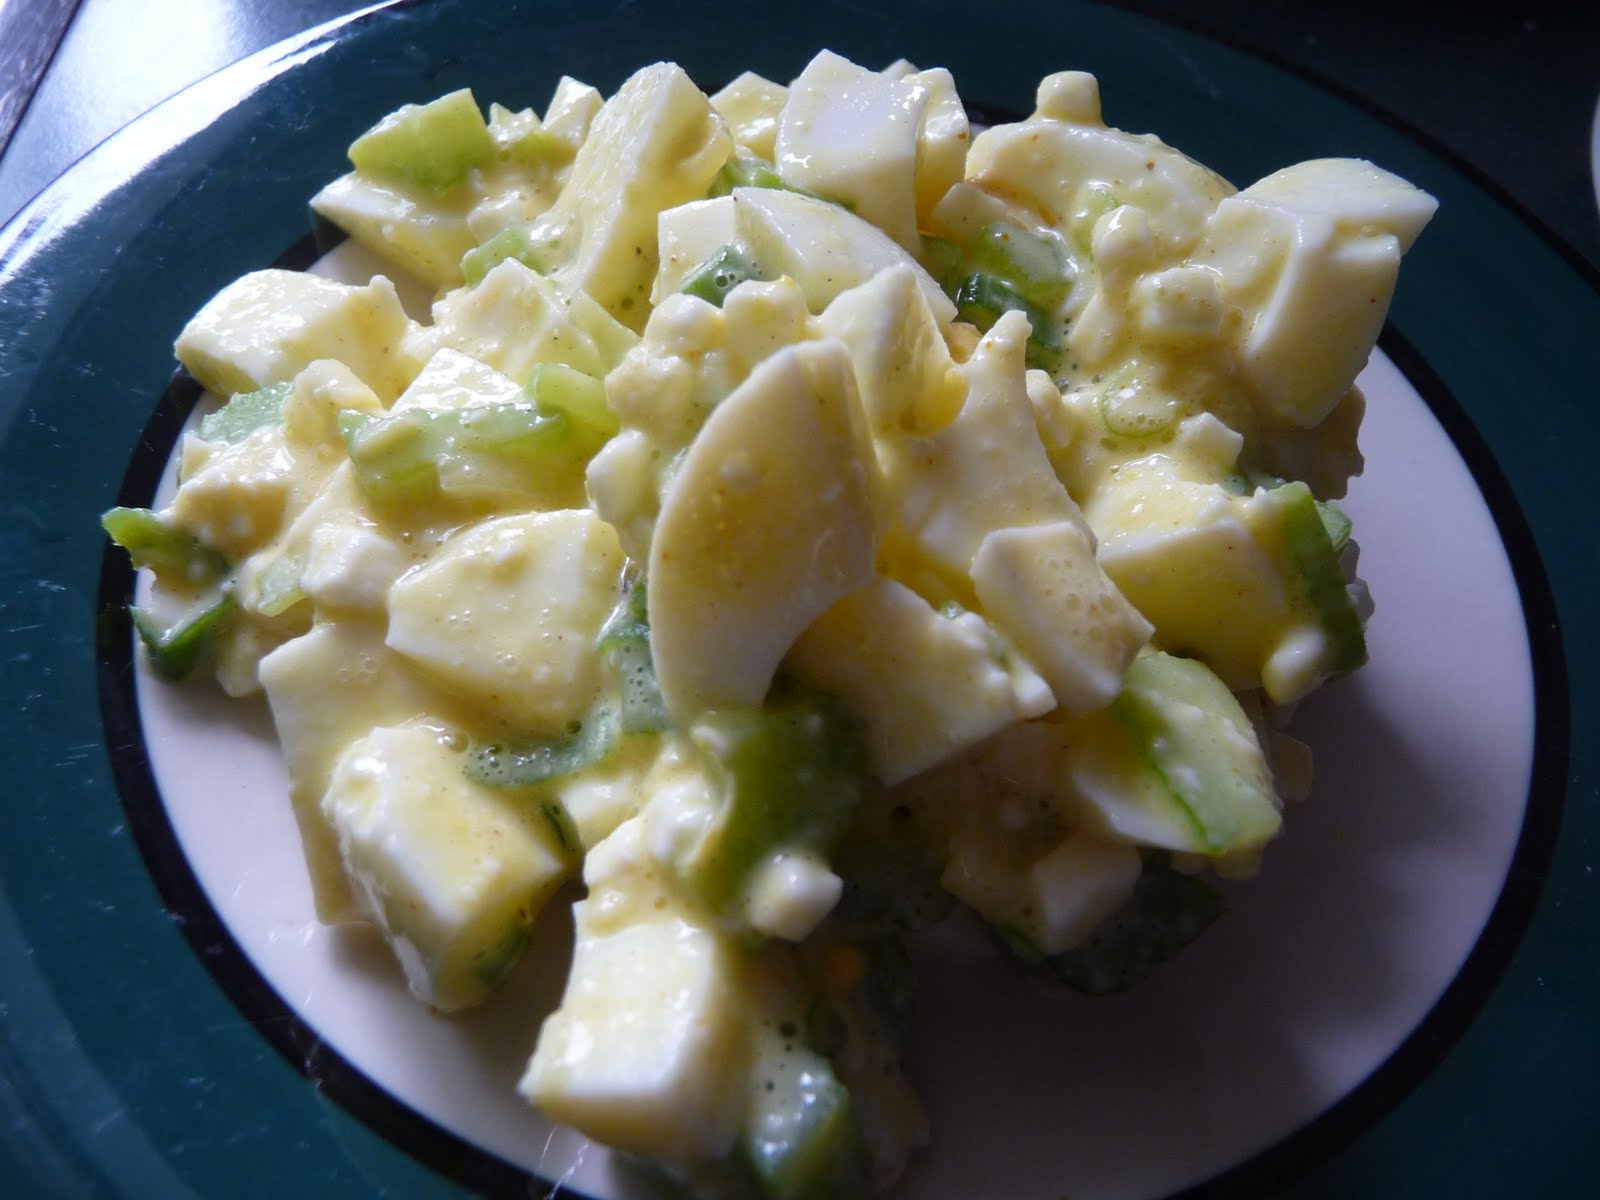
The H ate his with Mary's Gone Crackers, and the little guy ate his with a fork. Mine was placed atop a slice of locally-made whole-wheat bread. The recipe made exactly enough for the three of us. I really liked the texture, and the little hint of "hmm, what is that ingredient?" nuance from the curry powder.
Nutritional information for a half-cup serving:
Calories - 170
Fat - 3.5g
Saturated fat - 1g
Trans fat - 0g
Protein - 17g
Carbs - 18g
Dietary fiber - 3.5g
Sodium - 528mg
Cholesterol - 106mg
Sunday, May 2, 2010
Roasted Beet Frittata with Goat Cheese
This was my first experience with beet greens. When I've bought fresh beets in the past (and it's been less than a year now) they've either been trimmed already, or the tops didn't look appealing enough to save. This time, however, the set of greens on my beets was so fresh and vibrant that I couldn't imagine throwing them away. Instead, I set out to find a great recipe for them.


My search led me to a starred post in my Google Reader, Roasted Beet Frittata with Beet Greens, Shallots, and Goat Cheese from Cara's Cravings. I've made a lot of great recipes from her blog, and this was no exception.

Roasted Beet Frittata with Beet Greens
from Cara's Cravings
serves 1 as written
1 small shallot, minced, about 20g
1 bunch fresh beet greens, rinsed well and rough-chopped
Freshly roasted beets, about 85g, sliced thin
2 large eggs
2 Tbsp non-fat milk
Salt and black pepper, to taste
1 oz soft goat cheese
1/4 oz chopped pecans

1. Preheat oven to 375 degrees.
2. On the stovetop, heat a small, oven-proof skillet over medium heat. Spritz with cooking spray and add shallots. Cook for a few minutes until softened.

3. Add beet greens to skillet and continue to cook until wilted.

4. Whisk together eggs and milk; season with salt and pepper. Arrange beets on top of shallots and greens in skillet.
5. Raise the heat to medium-high and pour the eggs over the vegetables. Let cook without stirring for a few minutes so the bottom can set.
6. Crumble the goat cheese over the top and add pecans. Place skillet in preheated oven for 10 minutes, or until top is set.
I thought I had everything to make this as written, but it turns out the last of my pecans got tossed into my oatmeal this morning, so I subbed in pine nuts (which the little guy calls "pinecone seeds") and we proceeded without a hitch (the first pic above shows walnuts, which I thought I'd use, but decided against because of their stronger flavor). My 12" cast-iron skillet worked great for this recipe (use a pot-holder on the handles!) since I sort of doubled the recipe to feed the three of us. It was a little thin, but nobody seemed to mind.

When you use beet greens, make sure to rinse them really well. They are dirty, sandy little buggers! Even though I rinsed several times and spun them dry on food-prep day, I still had to let them sit in cold water tonight (twice) and swish them around to loosen all the grit.

As for quantities, I used two shallots, three whole eggs and two additional egg whites, about 128g of beets since that is what I had left after roasting some this weekend, 2 ounces of goat cheese, 0.5 ounces pinenuts, 1/4 cup of milk, and five fresh baby bella mushrooms to bulk it up a little more.

The H ate half of the skillet shown, and the little guy and I shared the other half. He happily gobbled up his slice, beets, greens and all, which blew me away. He loved that we called it "cheesy pinecone seed eggs." I've said it before--when it comes to kids (or picky husbands)--whatever works!

I love how quickly and easily this came together, considering that my beets and greens were already mostly prepped, and my goat cheese was pre-crumbled. While this was on the stovetop I thought two things: 1) add the cheese and nuts right after you add the eggs, so the cheese can really soften and the nuts can "settle" into the eggs more, and 2) this would make a beautiful addition to a Mother's Day brunch--I will definitely be making it again, and probably very soon.
Monday, March 29, 2010
Clean quinoa and cheesy quiche
Say that one three times fast! Both of these recipes are from Clean Eating Magazine, which I had perused just before making my meal plan and shopping list for the week. I chose them for several reasons:

1. They are both meatless, which I try to do on Mondays, yet contain satisfying amounts of protein
2. Both call for dried oregano, which I hoped meant they would complement each other
3. They are both based on things the little guy likes, so I was planning on him gobbling them up
They were enjoyable, and I can see myself making them again. I could eat the quiches at every meal and twice on Sundays, but The H liked the quinoa better. It would make an excellent side dish to balsamic-marinated, grilled chicken. I will add more peas next time. The little guy only wanted the cheese from the top of his quiche, and spit out any broccoli we tried to hide underneath. You can't win 'em all.
Quinoa Sopa Seca
from Clean Eating Magazine, March/April 2009, Vol. 2 Issue 2
serves 6
Ingredients:
1 Tbsp olive oil
3 green onions, sliced
1 red bell pepper, diced
1 tsp dried oregano
1 clove garlic, minced
1 cup quinoa
Pinch of sea salt
1/2 cup frozen peas, thawed
1/2 cup tomatoes, seeded and chopped (I used 1/2 cup salt-free diced tomatoes in juice)
Directions:
In a medium saucepan with a lid, warm the oil over medium-high heat. Add the onions and bell pepper and cook, stirring, until soft, about 5 minutes. Add oregano and garlic and cook for 30 seconds. Stir in the quinoa (rinse it first if yours is not pre-rinsed, to remove the bitter saponin coating), then pour in 2 cups of water and the salt. Bring to a boil and reduce heat; cover and simmer until liquid is absorbed and the quinoa grains show opaque lines around their edges (this is the germ splitting apart), about 12 minutes. Turn off the heat and stir in the thawed peas and tomatoes. Cover pan again and let stand until heated through, about 5 minutes. Keep warm until ready to serve.
Nutrition information per 1/2 cup serving:
Calories - 150
Fat - 4g
Carbs - 23g
Fiber - 4g
Sugars - 2g
Protein - 5g
Sodium - 55mg
Cholesterol - 0mg
Crustless Broccoli & Cheese Mini Quiches
from Clean Eating Magazine, March/April 2009, Vol. 2 Issue 2
serves 5
Ingredients:
Olive oil cooking spray
1 tsp olive oil
1 1/2 cups broccoli, chopped
2/3 cup low-fat shredded cheddar cheese, divided
1 cup low-fat Greek yogurt
2 Tbsp low-fat milk
1 whole large egg
1 tsp dried oregano
1/4 tsp sea salt
Fresh ground black pepper, to taste
Directions:
1. Preheat oven to 350* and spray 10 cups of a muffin pan with cooking spray (don't try to stretch this recipe into 12 cups unless you increase the egg mixture by more than just one egg white).
2. Heat oil in a medium skillet. Add broccoli and saute for 5 minutes (or use frozen broccoli, thawed in the microwave, and skip this part altogether, eliminating the oil as well). Distribute broccoli evenly among the prepared muffin cups, then distribute half of the cheese on top.
3. In a medium bowl, whisk the yogurt, milk, egg, and seasonings. Distribute evenly over broccoli and cheese. Top with remaining cheese and bake 20-25 minutes, until quiches are set and lightly browned around the edges. Let cool 5 minutes and serve, or cool and refrigerate until ready to eat.
Nutrition information for 2 quiches:
Calories - 100
Fat - 3.5g
Carbs - 6g
Fiber - 2g
Sugars - 1g
Protein - 11g
Sodium - 240mg
Cholesterol - 40mg
Sunday, February 28, 2010
Hard-boiled eggs and my mama's hummus
My mom makes a phenomenal hummus. It blows mine out of the water. It might have something to do with simmering the garbanzos first, something I just never seem to have the time or patience for. When I want hummus, I want it yesterday. Tonight, in my food prep for the coming week, I decided to make a double batch. I still didn't boil the beans, but I must have gotten the proportions just right this time. Tangy from the lemon, creamy from the tahini, with a touch of garlic and salt in the mix. Not quite as smooth as Mom's, but it's good. It will go very well with the red and yellow peppers and English cucumber I cut up for snacking. 

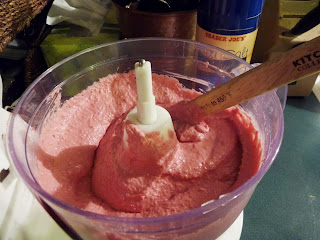


While shuffling things around in the fridge in preparation for the massive quantity of pureed chickpea about to take up residence there, I came across a container of roasted beets that I made last week for chicken beet salad. Yummy. In a flash of brilliance, I remembered that fellow blogger Branny had made a stunningly-colored beet hummus and I decided to throw a few into the food processor with the garbanzos and garlic.
When it was pureed smooth, it reminded me of one of those obnoxiously-sweet Jell-O fluff salads that seem to appear out of nowhere at church potlucks. Rest assured, it tastes nothing like it. The beets did not affect the flavor whatsoever. Just like the spinach in a green monster smoothie, the taste is masked, but the color and benefits of the veggies are there. Did you know that garbanzo beans can help lower your cholesterol? I learned this by poking around on one of my favorite websites, "The World's Healthiest Foods." Here is the link to the page about garbanzo goodness.
I made enough for The H to take on the road for work, some for snacking tonight, two tiny boxes for me and the little guy to grab on the go (great use of reused leftover baby food containers!), and a big ol' tub for use during the rest of the week. I love my label maker!
As most moms do, I was multitasking as I was whipping this up, also boiling eggs for snacks and the little guy's meals. More on that in a future post.
My method for hard-boiled eggs is to put the eggs in a pan and cover with cold water:
Then bring to a boil, turn off the heat, cover, and let sit for 15 minutes. Then dump the hot water and flush the pan with cold water. I like to add a handful of ice cubes to help speed up the process.
When the water is cool, or after about 10 minutes, I set the eggs on a towel to dry, then store in the fridge.
Here is the recipe for my mama's hummus, just the way she makes it. Adjust quantities of lemon, garlic, and salt to taste.
Mom W's Hummus
1 clove garlic, roughly chopped
1 can (15oz) garbanzo beans, liquid reserved
1/3 cup tahini
2 Tbsp olive oil
1 tsp salt
1 lemon, juiced
1. Simmer the beans in half of the reserved juice for 10 minutes; let cool. Do not drain.
2. Process beans, garlic, and tahini to a rough consistency.
3. Add the olive oil, salt, and lemon juice. Process to desired consistency.
Weekend breakfast
Alternating steel-cut oats with peanut butter toast and/or a green monster smoothie is fine for my weekday breakfasts, but sometimes on the weekend I prefer to indulge a little more. Those indulgences often happen after a good, long run, like The H and I had yesterday.


I started with a piece of local flax-bread toast with natural peanut butter and honey, since that is a self-approved pre-run fuel for me, but after slogging through seven miles of slush and mush, we were ready for something hearty. And dry socks.
Scrambled eggs, omelets, and frittatas are a great way to increase your veggie intake and use up some of the straggler produce that may have seen better days. Go take a peek in your crisper and see what you have to use! (Wait, finish reading, THEN go look.)
For this one, I used some local whole eggs + egg whites from a carton, fresh spinach, a big clove of fresh garlic, two fresh mushrooms, a Roma tomato, the end of a bag of shredded cheddar, and two leftover pieces of local nitrate-free bacon. After all, this was for The H, too. And leftover bacon isn't really good (to me) any other way except hiding in another dish.
I started by sauteeing the garlic, mushrooms, and spinach in some olive oil.
When the spinach was wilted, I whisked the eggs and whites with some ground cumin (just a little!), fresh ground black pepper, and a smidge of sea salt.
I poured the egg mix over the veggies and let it set for a while, gently stirring and lifting with a rubber spatula occasionally to let the uncooked egg run underneath. When it was mostly set, I sprinkled the cheese on top (The H added the bacon shards at some point) and put a salad plate on top to help it melt. I couldn't find the lid that fits this pan!
Once the cheese was melted I plated it up and we sat down to eat.
Mmm...coffee...
The cumin added a nice hint of something extra. I didn't use enough to make it spicy or taste like chili. I will use it again in future egg scrambles. A leftover potato or sweet potato, diced small, would have been good in this meal, so when you're rummaging through the refrigerator for goodies to include in yours, don't limit yourself to just the produce drawers. If I had been thinking more cleanly, I would have used more egg whites and fewer whole eggs. Next time!
What do you like to eat for breakfast on the weekend? Is it different from your weekday standbys?
Thursday, October 22, 2009
Poached eggs = fail
Tonight's dinner was going to be toast topped with roasted kale and a poached egg, with a side of sweet potato fries, thanks to inspiration from fellow bloggers CrumblyCookie and SimplyMe (this is my first attempt at linking on my Mac!) Alas, I apparently did not pay close enough attention all those nights during my childhood when my mom would make us poached eggs on toast. I got the boiling water part down, and knew to cook the eggs for as long as it cook the bread to toast, but beyond that, I was winging it. Nobody told me there had to be a certain amount of water in the pan, nor did anyone explain how to get the whites from shredding like cheap toilet paper mid-flush. My two beautiful farm-fresh eggs stuck to the bottom of my pan, and their golden moon yolks were left high and dry (or actually, rather slimy) due to my inexperience. One was salvageable, but the other served as a reminder to the dog that, although he gets reprimanded an awful lot, I do still like him. He was quite the attentive dinner companion after that.
As for the rest of the meal, it was divine. My sauteed kale was cooked in olive oil with garlic, orange bell pepper, and corn. This was my first experience with kale. The texture is "meatier" than spinach or chard, taking longer to chew, and the flavor was an excellent complement to the surviving egg. I liked that it kept its ruffle and did not wilt down to a pile of mush as spinach is wont to do. I used Tosca Reno's sweet potato oven fry recipe from The Eat-Clean Diet book, which is a spicier version of the Sweet Potato Oven Fries in The Eat-Clean Diet for Family & Kids book. The H and baby had a dinner date with H's parents, so I was free to cook for my own tastebuds. And my 'buds like spice.
So even though the eggs didn't go as planned, don't think I forgot about my toast! Ohhh no. I could never forget my toast... it was just a plain ol' piece of sprouted grain bread, until I smeared it with a hearty helping of artisanal cream cheese--one of my co-op selections from last night--that probably supplied my daily value of fat in one fell swoop. The texture was closer to goat cheese than the brick of Philadelphia you may be used to, but once it came to room temperature it was delightfully spreadable. Best.cream.cheese.ever. Thanks, Dancing Goat Creamery!
In case you've fallen asleep reading the previous three paragraphs, here's a recap: Dinner was garlic-sauteed kale with bell pepper and corn, topped with a messily-poached egg and served with spicy sweet potato oven fries and sprouted grain toast with locally-made fresh cream cheese. And it was very good.
Monday, September 28, 2009
Now *this* is fall!
The weather here today is nothing short of blustery. Tree-whipping, raindrop-slinging, shutter-shaking blustery. And I love it. This weather inspires a menu based around comfort foods. So long, cold salads. See you next year, outdoor grill. Bring on the CrockPots and roasting pans! To be fair, I do use my slow cookers year-round, but nothing says "fall" quite like a big simmering crock of chili and a pan of cornbread in the oven (too bad I made that last week, when the cooling temps suddenly jumped to 80 and humid...)
In keeping with my newest endeavor of local clean-eating whenever possible (it only seemed a natural progression) I picked up a few new things at the farmers' market last week. Selfishly, it's nice to see the crowds starting to thin (much easier to push a stroller and keep track of a sticky-fingered small boy while juggling my bags), though I know that means people aren't supporting the local farmers as much as they do the summer. I don't want to be just another fair-weather supporter, so I'm currently trying to get The H to let us join the local co-op.
Anyway, one of our latest pleasures has been enjoying palm-frond sized leaves of chard as a "nest" for farm-fresh eggs. I first tasted chard at our anniversary dinner a few weeks ago at a local-food restaurant, and I loved it. Amazingly, it was not hard to reproduce that great flavor and buttery texture at home. I love the guy who sold me the chard; he has consistently given me great advice regarding how to prepare his produce (he's the one who gave me sorrel for free a few months ago, simply because it would complement the dinner I told him I was planning) and the portions he sells are a remarkable value. The eggs, from another local farm, were a wonderfully creamy addition.
Tonight I will attempt to cook a market-bought spaghetti squash to go with our balsamic-marinated roasted chicken breast. This was supposed to be last night's dinner, but a too-long trip to the grocery store necessitated other plans. It's just as well; the howling weather outside much more perfectly matches the fall feel of this meal. I'm planning to stir up a spinach-barley risotto for another side. And tomorrow, it's off to the market again to get more eggs and whatever other treasures are there.
Monday, August 24, 2009
Cooking ahead
"What's for lunch?" is often a more difficult question for me to answer than the usual, "What's for dinner?" Dinner (or supper, if that's what you call it) means cooking for my family. Dinner is why I comb through cookbooks and magazines in my spare time looking for delicious and healthy meals that fit with our clean-eating lifestyle. Dinner is eating with other people, so it's fun (for me, anyway) to plan for and look forward to.
But lunch? Lunch is lonely. It's something to get through on the way to my son's naptime, or eaten in a hurry at my computer while I try to get some work done once he's down. Lunch is usually leftovers, if The H hasn't taken them to work. Lunch is boring. A hurdle to jump over on the way to a delicious dinner.
Enter cooking ahead. Determined not to have boring lunches all week, I decided to make things from my clean cooking resources that The H wouldn't appreciate as much, or can't eat because of his allergy. Cooking ahead saves time in the long run, which is always nice, and something I've heard readers asking about lately. It doesn't take a lot of time, promise.
Tonight's dinner was one of our old standbys, a CrockPot casserole-type thing we call "chicken-salsa-rice." It's really a hands-off dinner, since the only real prep is pouring a jar of salsa over frozen chicken and turning the crock on low. Closer to serving time, cooked rice and shredded cheese are added, and sour cream if you want. When I made the rice this afternoon during snack time, I figured I might as well make a big batch to keep in the fridge for lunches or another dinner later this week.
After dinner, once the baby was fed, bathed, and in bed (by 7:30) I got to work in the kitchen. I'd had a package of Trader Joe's extra-firm tofu staring me in the face every time I opened the refrigerator and figured I should use it--the tofu burritos from Tosca's family & kids book were a perfect fit. The H has also been asking for hard-boiled eggs, so those needed to get made. And then there were the chicken breast tenders I wanted to use for dinner tomorrow (chicken taco salad). Sounds like a lot! But you know what? I was done, with the dishwasher running and my pans hand-washed, sitting in front of my computer before 8:45.
First, The H (never turn down free help!) put the eggs in a pot and started them cooking. He also laid out all the chicken tenders on a baking sheet and drained the tofu for me. And then it was my turn. Onion, garlic, jalapeno, bell pepper and tofu got chopped. Canned tomatoes were drained; juice was saved and labeled. Oil heated, veggies added, tofu stirred in. Mixture seasoned and simmered. Eggs done and cooled. Burrito filling container labeled and filled (I love my label maker), burrito pan washed. Egg pan rinsed and dried. Chicken checked, not done, timer set for another 10. Then I went to shower (ran a quick 3 miles before dinner) and came back to put the chicken away. Chicken pan rinsed, dishwasher started, the end! Whew.
Now I have a fresh (as in not left-over) option for lunch. I can add brown rice to the tofu filling in my whole-grain wrap, or use some plain tenders + rice + whatever seasoning for a different flavor, in a wrap or not. I can make a clean egg salad to eat on Ezekiel bread. My son can have an egg with his morning fruit-and-waffle. If The H doesn't take dinner leftovers, those are still available, too.
Tomorrow I will make a batch of oatmeal-egg-white wheat-free pancakes (would have made them tonight but didn't feel like washing the blender) to freeze for another breakfast or lunch choice. And you know what else? I haven't gone grocery shopping since last Sunday. All of this was made with ingredients I had hanging around! If you ask The H, or even my son's sitter, they'd have likely told you there was nothing to eat. Surprise!
I love cooking ahead. It might even help me love lunch.
Subscribe to:
Posts (Atom)


