Wednesday, July 28, 2010

As the Bean Sprouts: Week 2

Poor beans. They had to deal with a lot last week--massive downpours, undrained pots, brutal heat and humidity. Well, maybe they liked that last one, but the others weren't kind.

Here are the sprouts as they appeared two weeks after planting.

Bed 1: Neighbor's fence

These beans are the best-growing so far. I pulled out a few that weren't sprouting as much, to give the bigger ones more room.

Bed 2: Potted

Oh, my sweet, sad little flooded pot. I'm so sorry that I forgot to drill drainage holes in you. And I'm sorry that I forgot to move you to the back porch when Noah's Ark floated by in the storms.

Bed 3: Berry patch

Only one of the three seeds I planted here has grown to anything worth writing home about. The line of Morning Glory seeds I threw in the back is doing well, though. I think. This is the bed that shares space with my raspberry bushes, on which I found these:


Bed 4: Back 40

Oh THERE they are! I'd been watering the wrong area. Whoops. I planted two tomato plants from a friend back here as well. So far, still green. Woot!

Next update in two weeks.

Tuesday, July 27, 2010

Gluten free fruit cobbler

This recipe comes from celiac.com, a great resource for those transitioning to gluten-free living. We were planning dinner with The H's parents, and I wanted to use some of our co-op haul for dessert. I was looking for something that would go well with with ice cream. Fruit cobbler sounded just right.


I used four of these lovely peaches, and the rest of the organic blueberries, perhaps 1 cup.


Gluten Free Fruit Cobbler
from Celiac.com

1 stick of butter
1 cup gluten-free flour blend (your choice--I used Bob's Red Mill GF all-purpose)
1/2 tsp xanthan gum
1 cup sugar
1/2 tsp salt
1 tsp baking powder
1/2 tsp baking soda
1 cup kefir or buttermilk (I used milk soured with 1 Tbsp apple cider vinegar)
1 large can peach halves, or 2-3 cups frozen thawed berries to which 1/4 cup sugar has been added (I had a total of 4 cups fresh fruit)
Ground cinnamon, nutmeg, cloves, or other spices, to taste (optional)

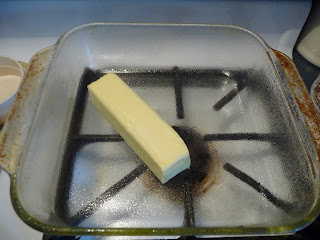
1. Preheat the oven to 350* and melt the butter in a glass 8x8 baking dish.

2. Mix all other ingredients, except for fruit. Pour batter onto melted butter. If you stir it around to incorporate the butter, you'll end up with a rich, buttery cakelike cobbler. If you don't mix it in, you'll have a chewy, buttery edge (I mixed it together).

3. Spread the fruit on top of the crust and sprinkle with spices of your choice. Bake 45 minutes or until set in the center.


Because of the full stick of butter and loads of sugar called for, I can't really consider this "clean" though there are certainly ways to clean it up.


I think the crust could get away with less than a full stick of butter (see how much is just sitting on top after I mixed it in? Yikes...), and the sugar in the dry crust mix could likely be cut back a bit and probably exchanged for sucanat. I just didn't have enough to try it.


I used maple flakes for the sugar on the fruit, though as I typed the recipe above, I think I could have omitted that since I wasn't using frozen berries, which are notably more tart than fresh peaches! If I were to use frozen, I'd try mixing them with honey rather than a dry sugar.


The spices I used on top of the fruit were cinnamon and nutmeg. I used a light dusting of each.


The middle was a bit soft after 45 minutes, so I left it in the oven for another 10, then turned it off and let the heat continue cooking it while we cleaned up after dinner.

It was still somewhat soft when we ate it, but since there was no raw egg or anything potentially harmful in it, we just dug in.


This made 9 servings. The H and his brother had two servings each, in rapid succession. It was one of the better gluten-free desserts I have eaten, let alone made from scratch. We didn't eat it with ice cream, but it was great nonetheless.

Thursday, July 22, 2010

Marathon training update

Today was my first run in my new shoes! I got a great deal on them online that even included a free running T-shirt. They are the shoes I currently run in, just a different color. These are the best shoes I've had since I started running in 2005. I'm hoping they (and their fresh, unused cushioning) help the leg pain I've been having on the right side. My doc, who is a runner himself, believes it's from a tight hamstring/inflamed piriformis muscle and I should go nuts with stretching every chance I get. At night when I'm on the computer, I sit on a knobbly dog ball and roll back and forth to help massage it. Yep, that's a mental picture you'll want to erase.

Today was also the last three-mile run of training. I won't run less than four miles again until I'm tapering my distance the week before the race. That made me feel kind of intimidated, though I know I have no reason to be. I've run longer than three miles plenty of times. Heck, I've gone as far as 16, and that was years ago before my first 25K. But knowing that the first six weeks--officially one third--of my training is over weighed a little on me. I'm now in the MIDDLE of training for a marathon. I can't let it eat me up, though. Part of what made me finally decide to run 26.2 miles is that only five runs, including the race, in the entire 18 week plan were longer than I've run before. I can handle five runs.

The weekend long runs so far have gone up to 12 miles, though I stopped at 11 that day because the route I'd chosen was just too hilly to contemplate the remaining 0.95 miles. It was a fairly miserable run and I wanted to quit more than once. But the point of training is to get *through* tough crap like that, right? Even though I walked some of it, I covered the distance on my own two feet. Small victory.

This weekend, my long run is 9 miles (a step-down week before next week's 14), which I'm hoping to do before the heat index reaches the 100 degree mark! Yikes. I'm thankful for our treadmill in the air-conditioned basement. Right now my plan is to run 2 on the 'mill, head outside for 5 miles, and plan to finish the last 2 on the treadmill again if the heat is too much at that point. Kind of depends what time I get out the door. After that we're visiting family for a few birthday celebrations. I see cake in my future!

Tuesday, July 20, 2010

Whole Wheat Flubber

This was my first attempt at bread-from-scratch in at least 10 years. I do have a bread machine, but I've been making The H's gluten-free bread in it and I don't want to risk cross-contamination. I've also been purchasing wheat and/or multigrain bread from a local baker, but I ran out before payday/shopping day and thought I'd attempt it on my own.


I used this recipe from the Clean Eating Magazine website. Seems simple enough... flour, yeast, water, honey, oil, salt, all of which I have readily available all the time. (Well, my wheat flour was "readily available" because it's been ages since I've used it. And though it gets stored in the refrigerator, I did not have high hopes for its level of freshness.) After the initial 30 minute rest period as I was beginning the first knead/rise cycle, two things caused me slight concern:

1. The dough smelled like cupboard.
2. It was the texture of Flubber.

When I went to knead it the first time, I seriously feared it would glom over the edges of the board and onto my kitchen floor.


Back into the bowl it went. I whipped it around with a spatula to incorporate the other ingredents. I did the same for the second knead/rise cycle and then let its rubbery self flump into my olive-oiled loaf pan for the last rise.

I'm glad I had the foresight to put a baking sheet underneath the loaf pan for the final rise...


And although I may have killed the end result in the process, I decided right then to split the loaf between two pans. There's no way I wanted *that* cooked onto my oven, thankyouverymuch.


The loaves came out short (duh) but tasted fine enough. I still think my flour is too old.


The texture is lovely; airy and light but substantial enough to not fall apart when buttered. I tried some with SmartBalance 50/50 blend, that's how I know.


But there was a nagging voice in the back of my head, asking, "What if you DIDN'T split the loaf? Would it have really overflowed the pan?" Wanting to be sure, I decided to make another batch. Seriously, the ingredients are so minimal and it only takes about 2 hours from start to finish. The H's gluten-free loaves take 2 hours and 39 minutes, and while that is hands-off time thanks to the machine, most of this recipe is pretty hands-off, too. Besides, if nothing else, making another batch would help me use up the bag of flour so I can buy a fresh one. If it ends up tasting funky, I'll let the little guy feed it to the ducks on our next run through the park.


Here is the second loaf on its final rise:


Yep, overflowage. It had the same rubbery-elastic texture that the first batch had. There is no kneading of this recipe, folks. Don't even try. Stick with old fashioned stirring. This time, rather than freaking out and dividing it, I carefully folded the escaping edges back over the top and gave it a few gentle pokes to deflate it a little, but not flatten.


Only a few minutes after it went into the hot oven to bake, I could see it crowning smoothly above the top of the pan--not awkwardly climbing over the sides. Hooray! The top was a bit more rounded before I opened the oven to peek. Oops.


Now that's more like it!


Happy sandwich-making to me! I really love how simple the recipe is: flour water yeast, honey oil salt. Clean AND cheap.

Monday, July 19, 2010

Brought to you by the letter "B"

I felt like a Sesame Street character as we sat down to dinner tonight, pointedly showing the little guy that his dinner was Basmati rice, Boston Baked Beans, and Barbecue chicken. Yes, it was coincidental. Also delicious.


Branny gave us a home-run with the beans; I've been wanting to attempt something like this for a while but didn't know where to start. Thanks, Branny! We loved 'em. I cooked them in a 2.5qt slow cooker. Cutting the recipe in half (using 1 pound dried beans) yielded enough beans for three dinner servings, two leftover portions, and enough to freeze for a future dinner-for-3. I used cranberry beans since that is what I had, and omitted the bacon called for in the original recipe (see link).


The chicken was simply grilled and basted with Trader Joe's BBQ sauce, my personal favorite. The rice was a basmati-wild-rice blend I've had for awhile; it has dried vegetables in it. I cooked it in homemade beef broth, leftover from when I pressure-cooked stew beef for my curry last week.


The little guy ate his entire ramekin of beans, punctuating a few bites with a pipsqueaky "Mmm, I love Bos'on beans." He ended his Letter B Dinner with a gluten-free Brownie. What else? :)

Sunday, July 18, 2010

This week's menu

The fridge, freezer, and pantry are looking lean indeed. I had to dig deep to create this plan. My goal is to put off shopping until payday (Tuesday) and then stick to a bare-necessities list because we have co-op pickup on Wednesday evening. Getting through Wednesday sure gave me trouble! Here's what I managed to eke out:

Sunday lunch - leftover beef curry over brown rice for me and The H (plus a Greek yogurt for him); mac 'n' cheese, turkey, edamame and pretzels for the little guy

Sunday dinner - homemade pizza with red pepper, spinach, homemade sauce, mozzarella, nitrate-free pepperoni, roasted garlic if I get that ambitious...

Monday - BBQ chicken breasts and Branny's Boston Baked Beans, probably with barley for a side, unless I buy corn on the cob before then...

Tuesday - Vegetable soup based on this recipe in the slow cooker, made with a bag of frozen veggies, homemade broth, some sad parsnips left in the veggie keeper (just for flavoring, I won't make us eat them), chickpeas, and rice pasta

Wednesday - Gluten-free macaroni with peas or edamame, soy-flax tortilla chips and pineapple salsa, homemade gluten-free banana bread

Thursday - Leftovers, whether I run with friends or not

Friday - Grilled chicken, co-op purple beans, brown rice

Saturday - Gluten-free Monte Cristo sandwiches (basically, gluten-free French toast/grilled cheese with turkey, Swiss, and jam inside), co-op peaches, and co-op bacon

Thursday, July 15, 2010

When outside feels like an oven...

the last thing you want to do is stand over a fire to cook your meal!

The little guy and I moved our intended-for-the-grill meal indoors last night. The heat and humidity were just too much. A/C for me, please!

This is what the kitchen looked like 10 minutes before we ate:


And this is what we sat down to:


Local corn, local cusa squash with local yellow onion, chicken apple sausage, plus applesauce and a few grape tomatoes for the little guy. He loves those sausages. We get them at Trader Joe's, though I know other places sell them. We've even had some local ones! He calls them "hot dogs." I don't correct him. He's started to eat his corn on the cob as intended rather than having it cut off the ear, which I think is adorable.


I'm his mom. I get to think that. ;)

Wednesday, July 14, 2010

As the Bean Sprouts: Week 1

This is the first weekly update (originally I'd said two weeks, but things moved faster than I expected) on my bean experiment. My mother-in-law noticed green sprouts coming up in Bed #1, by the neighbor's fence, on Tuesday night. I went out and took some pictures this morning.


By 8pm tonight, when the little guy and I got home from the bookstore, they were even larger, and more had sprung up. They've grown so quickly, it's almost as if we could watch them sprout. Amazing!


So far this is the bed with the most progress. The only other one (of the four) to show any promise yet is Bed #4, the one in the overgrown back garden.


Stay tuned for next Wednesday's riveting edition of "As the Bean Sprouts." :D I hope the vicious rain that is forecast tonight doesn't hurt them too badly... perhaps I will move Bed #3, the potted one, to the back porch tonight.

Tuesday, July 13, 2010

My meal plan

The H is traveling this week, which lately has made me drag my feet when it comes to menu planning. Here's what I have on the docket for me and the little guy:

Monday - leftover pizza, cottage cheese, applesauce

Tuesday - leftover local beef/black bean nacho filling for the little guy (he calls it farm beef! I love it!); frittata with zucchini, red pepper, and onion for me after running (6 miles today)

Wednesday - corn on the cob, chicken apple sausage, cusa squash -- probably all grilled

Thursday - curry beef over brown rice with grape tomatoes

Friday - local beef fajitas with corn tortillas

Saturday - hmmm...

Cross-training

Part of my marathon training specifies "cross training" one day per week. I'm not a swimmer. We don't have access to a gym or tennis court, so those are out. I can't rollerblade with the little guy (can you imagine?!), BUT I've had a bike in the garage for as long as we've lived here. Time to use it!


My father-in-law picked up this trailer for us at a yard sale earlier this summer. Here are some pics from our inaugural ride.


The little guy was *exhausted* but he didn't want to go back home. He kept asking for "more, more, faster!" He had played in the pool earlier for quite a long time and that always wears him out. He slept great! :)

Originally, I had intended to use it for biking to the farmer's market, but a quick Google Maps search showed that it's nearly 8 miles round trip (I was huffing and puffing after less than 2 last night) and it's not through the greatest area. Guess we'll stick to neighborhood treks for now.


Yep, I make this look good.

Monday, July 12, 2010

My bean experiment

I'm not a gardener. That is a fact. Green thumbs have I not. However, what I *do* have is the space to grow things (just not maintain them), and family members who just won't stop giving me living (or aspiring-to-be-living) things. Thus, I had a packet of green bean seeds--bush beans--to plant this summer. I was a little slow on the uptake and didn't get them into the ground until July, but my mom (who is a master gardener, true story) says they still have plenty of time to grow.

So, here we are. There are a LOT of seeds in one little packet, did you know that? And, unlike flower seeds, you're only supposed to plant one seed per hole. (Maybe flowers are like that, too. I wouldn't know.) I didn't want to just plant a handful of the plethora, so I began a little experiment. I planted beans in four different areas of my yard. Be proud.

1. By the neighbor's fence, partial sun.


2. In a pot on the front porch, full sun unless I move it. This is the only movable one.


3. Next to my raspberry bushes (how the heck those grew, I'll never know... they were all but dead when they went into the ground!), mostly sunny. I added the dregs of my potting soil bags to this spot.


4. In the back (yes, overgrown) garden bed, mostly sunny. The little guy, with help from my mom, put some back here.


It is my intention to take pictures of each location every two weeks and see how the beans are progressing. Hopefully at the end of the summer at least one of them will have something to show for all my beyond-my-comfort-zone work.

Do you have a garden this summer? What is growing in it?

Beans, beans...

One of our favorite summer vegetables is fresh green beans. I got some at the farmer's market last week, since the ones I planted (yes, very late) aren't even growing yet. When we bought them, the little guy was munching them raw! I had a different idea in mind for dinner last night, though. We started eating beans prepared this way a few years ago when I stumbled across a recipe online.


First, sauté diced onion in olive oil. Then add the beans. If you have more beans than I did (one pound) do half at a time.


Stir around so the beans get covered in the oil; season to taste with salt and pepper. Then let 'em sit there and get all black and blistery. Tasty, right? :) The onions get sweet and caramelized, and the beans get *just* tender, but not mushy in the least.


We served these with grilled local beef burgers and cheese from our great state.